Friday, June 11, 2010

Liferay startup failed error.

Although I was able to run Liferay 5.2.3 on my windows vista machine for a long time, suddenly it stop working because when I click startup.bat it gives the following errors and startup failed.

SEVERE: Context [] startup failed due to previous errors
20-May-2010 14:25:10 org.apache.catalina.loader.WebappClassLoader loadClass
INFO: Illegal access: this web application instance has been stopped already. Could not load org.apache.log4j.spi.LocationInfo. The eventual following stack trace is caused by an error thrown for debugging purposes as well as to attempt to terminate the thread which caused the illegal access, and has no functional impact.
java.lang.IllegalStateException
at org.apache.catalina.loader.WebappClassLoader.loadClass(WebappClassLoader.java:1273)
at org.apache.catalina.loader.WebappClassLoader.loadClass(WebappClassLoader.java:1233)
at java.lang.ClassLoader.loadClassInternal(ClassLoader.java:319)
at org.apache.log4j.spi.LoggingEvent.getLocationInformation(LoggingEvent.java:247)
at org.apache.log4j.helpers.PatternParser$LocationPatternConverter.convert(PatternParser.java:483)
at org.apache.log4j.helpers.PatternConverter.format(PatternConverter.java:65)
at org.apache.log4j.PatternLayout.format(PatternLayout.java:502)
at org.apache.log4j.WriterAppender.subAppend(WriterAppender.java:302)
at org.apache.log4j.WriterAppender.append(WriterAppender.java:160)
at org.apache.log4j.AppenderSkeleton.doAppend(AppenderSkeleton.java:251)
at org.apache.log4j.helpers.AppenderAttachableImpl.appendLoopOnAppenders
(AppenderAttachableImpl.java:66)
at org.apache.log4j.Category.callAppenders(Category.java:206)
at org.apache.log4j.Category.forcedLog(Category.java:391)
at org.apache.log4j.Category.log(Category.java:856)
at com.liferay.portal.log.Log4jLogImpl.info(Log4jLogImpl.java:80)
at com.liferay.portal.kernel.log.LogWrapper.info(LogWrapper.java:124)
at com.liferay.portal.kernel.deploy.hot.HotDeployEvent.initDependentServletContextNames
(HotDeployEvent.java:108)
at com.liferay.portal.kernel.deploy.hot.HotDeployEvent.(HotDeployEvent.java:57)
at com.liferay.portal.kernel.servlet.HookContextListener.contextInitialized(HookContextListener.java:47)
at org.apache.catalina.core.StandardContext.listenerStart(StandardContext.java:3843)
at org.apache.catalina.core.StandardContext.start(StandardContext.java:4342)
at org.apache.catalina.core.ContainerBase.addChildInternal(ContainerBase.java:791)
at org.apache.catalina.core.ContainerBase.addChild(ContainerBase.java:771)
at org.apache.catalina.core.StandardHost.addChild(StandardHost.java:525)
at org.apache.catalina.startup.HostConfig.deployDirectory(HostConfig.java:926)
at org.apache.catalina.startup.HostConfig.deployDirectories(HostConfig.java:889)
at org.apache.catalina.startup.HostConfig.deployApps(HostConfig.java:492)
at org.apache.catalina.startup.HostConfig.start(HostConfig.java:1149)
at org.apache.catalina.startup.HostConfig.lifecycleEvent(HostConfig.java:311)
at org.apache.catalina.util.LifecycleSupport.fireLifecycleEvent(LifecycleSupport.java:117)
at org.apache.catalina.core.ContainerBase.start(ContainerBase.java:1053)
at org.apache.catalina.core.StandardHost.start(StandardHost.java:719)
at org.apache.catalina.core.ContainerBase.start(ContainerBase.java:1045)
at org.apache.catalina.core.StandardEngine.start(StandardEngine.java:443)
at org.apache.catalina.core.StandardService.start(StandardService.java:516)
at org.apache.catalina.core.StandardServer.start(StandardServer.java:710)
at org.apache.catalina.startup.Catalina.start(Catalina.java:578)

But at the end I was able to run it with out any problem after removing the following from the from the bin/setenv.bat.
if not "%JAVA_HOME%" == "" (
set JAVA_HOME=
)
Although it is working well now, I'm wondering why this has happened suddenly...................!

Tuesday, May 4, 2010

Installing Bugzilla on Windows

Bugzilla is a Web-based general-purpose bugtracker and testing tool originally developed and used by the Mozilla project, and licensed under the Mozilla Public License. Bugzilla is usually runs on Linux or Solaris. But it is possible to install it in other Operating Sytems and here are the steps to install Bugzilla on Windows OS

Things to download:
Steps to Install:
  • Extract Bugzilla TarBall archive to the directory of your choice. Eg: C:\Bugzilla.
  • Install the MySQL as usual.
  • Create a database for bugzilla on MySQL database using the following command.
create database bugs;
GRANT ALL PRIVILEGES ON bugs.* TO 'bugs'@'localhost' IDENTIFIED BY 'sockmonkey';
  • Download the ActiveStatePerl and install it to C:\Perl.
  • To avoid problems, create the C:\Temp directory (it has to be on drive C) and ensure SYSTEM has write and modify access.
  • Bugzilla requires a number of perl modules to be installed. Following are the commands and output for this installation.
  • Download and install the Apache HTTP server.
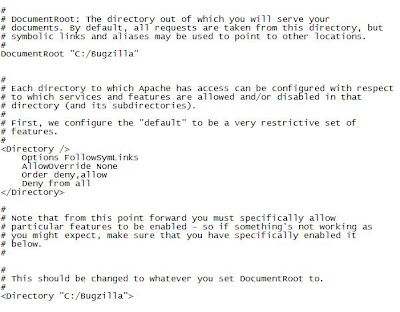
  • Edit the C:\Program Files\Apache Software Foundation\Apache2.2\conf\httpd.conf to set the Document root as follows.It is necessary to change both DocumentRoot and properties.
  • Enable the CGI handler by uncommenting AddHandler cgi-script.cgi line as follows.
  • Allow .cgi scripts in the Bugzilla directory by adding the ExecCGI option as follows.
  • Allow Bugzilla's .htaccess file to restrict access to sensitive documents by allowing it to override the defaults. This involves changing AllowOverride None to AllowOverride All as follows.
  • Add index.cgi to the DirectoryIndex list.
  • For ScriptInterpreterSource Registry-Strict to work, add an entry to the Registry so Apache will use Perl to execute .cgi files. Create a key HKEY_CLASSES_ROOT\.cgi\Shell\ExecCGI\Command with the default value of the full path of perl.exe with a -T parameter as follows.

  • Disable logging by commenting out the CustomLog directive as follows.
  • Finally, restart Apache to get it pick up the changes.
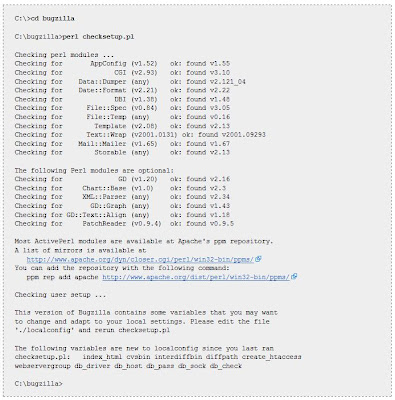
  • Run C:\Bugzilla\checksetup.pl to check the Perl modules and create localconfig as follows.
  • Open C:\Bugzilla\localconfig to configure Bugzilla add the db_pass as follows.
  • Run checksetup.pl again. This time it will build the database tables and initialise Bugzilla.
  • Go to and http://localhost/ log into to Bugzilla using the account checksetup.pl just created.

References : Bugzilla:Win32Install

Saturday, April 10, 2010

Create a JSR 168 compatible JIRA portlet for Liferay.

Although Liferay web portal has a JIRA portlet which comes under World of Liferay (WOL), it is not a generic portlet which can be configured to work with any JIRA installation. It is written in a way which can display the issue summery from the Liferay organisation's JIRA application. This portlet is tightly bundled with several other portlets which are also in the WOL category. Also the code of the portlet was scattered everywhere, which made it is very difficult to understand. So extending the functionalities and maintaining the code was extremely hard.

But I had a requirement of creating a portlet which can be communicate with any JIRA installation. So I implemented a JSR 168 compatible portlet for JIRA. You can refer to this for get an idea about how I implemented that. Following diagrams shows the JIRA portlet.
  • This is the first view of the portlet when you add that to the portal page.
  • After user click on the link above, he can see the following edit mode of the portlet. Here user needs to enter the URL of the JIRA application and the Login name of the JIRA.
  • After the required values are entered these values are stored as preferences to the portlet and it will display the success message as follows.
  • Finally after the user Return to the full page, it will display the issue counts as follows.
You can download the complete source code of it from here and feel free to use it and give comments.

Saturday, March 27, 2010

Creating Liferay Themes

Liferay Themes customize the overall look and feel of Liferay and were introduced in version 3.5 of the portal. There are two ways to develop themes for Liferay. They are using,
  • Liferay Plugins SDK
  • Using Portal Pack on NetBeans IDE With Theme Plugin Support

Here I explained how to develop themes using Portal Pack on NetBeans. Before you start, install the Portal Pack 3.0.2 plugins on NetBeans IDE 6.5, 6.5.x, or 6.7 version. You can download the latest Portal Pack plugin from here.

You can refer this to Install the portal pack plugins and add the Liferay server to NetBeans.

Create a Web Application That Uses Liferay Portal Server as the Target Runtime:
  • Choose New Project from the File menu.
  • By default, Java Web and Web Application are selected from Categories and Projects respectively.
  • Click Next.
  • Type a name for the project, and click Next.
  • In this example, name the project CustomTheme.
  • Select WLiferay Portal Server5.1.x/5.2.x as the server, and click Next.
  • Click Finish.
To Create a Liferay Theme:
  • Right-click the project (CustomTheme) and choose New → Other.
  • A window appears.
  • Choose WebSpace/Liferay Plugins from Categories and Import/Create New Themefrom File Types, and click Next.
  • Type a Theme ID and Theme Name. You can also specify a theme folder.
  • In this example, use Custom_theme and Custom Theme as the Theme ID and Theme Name respectively. If you are creating more than one theme, it is better to create a Theme Folder as well.
  • Click Finish.
Making Changes to the Theme:
  • You can change the theme by adding new images to images/common folder and edit the custom.css file.
Deploy the theme:
  • To deploy the custom theme, right-click the project and choose Deploy.
  • The theme is deployed to the Liferay Server, and you can apply the theme to the Liferay instance on your machine.
Build a .war file of the theme:
  • Copy the folder of the theme (Which is in Liferay webapps folder) to a seperate location.
  • Using command prompt navigate to that folder location.
  • Then enter the following command in the command prompt.
jar -cvf themename.war *
  • Then it will create a file called themename.war file and you can use it to deploy in other liferay instances.

Tuesday, March 16, 2010

Integrate Liferay with CAS server.

Central Authentication Service (CAS) server is a single sign on (SSO) protocol for the web. Its purpose is to permit a user to access multiple applications while providing their credentials (such as userid and password) only once. It also allows web applications to authenticate users without gaining access to a user's security credentials, such as a password.

CAS was conceived and developed by Shawn Bayern of Yale University Technology and Planning. In December 2004, CAS became a project of the Java Architectures Special Interest Group, which is as of 2008 responsible for its maintenance and development. Formerly called "Yale CAS", CAS is now also known as "JA-SIG CAS". In oder to implement SSO with Liferay, I used the CAS server.

Following steps gives all the steps that I followed implemennting SSO in Liferay. I used Liferay (liferay-portal-tomcat-6.0-5.2.3), CAS Server (cas-server-3.3.5-release) and CAS client (cas-client-2.0.11).

Setting up CAS server:
  • Download the CAS server from http://www.ja-sig.org/downloads/cas/
  • Rename the cas-server-3.3.5\modules\cas-server-webapp-3.3.5.war to cas-web.war.
  • Drop the cas-web.war file into Tomcat's webapps directroy. (For testing purposes I used the Liferay's tomcat but in a production environment CAS servershould really run on its own tomcat instance.
  • Then edit the server.xml file in tomcat and uncomment the SSL section to open up port 8443 as shown below.

Setting up the CAS client:


Generate the SSL cert with Java keytool:

  • In any directory ( I use my root ) enter the command:
keytool -genkey -alias tomcat -keypass changeit -keyalg RSA
  • Answer the questions as shown in the image: (note that your firstname and lastname MUST be hostname of your server and cannot be a IP address; this is very important as an IP address will fail client hostname verification even if it is correct)
  • Then enter the command:
keytool -export -alias tomcat -keypass changeit -file %FILE_NAME%
I use server.cert for %FILE_NAME%.
  • Finally import the cert into Java's keystore with this command.
keytool -import -alias tomcat -file %FILE_NAME% -keypass changeit -keystore %JAVA_HOME%/jre/lib/security/cacerts
  • Startup the CAS server by startup.bat in the bin folder.
  • Now you are ready to startup your CAS server. Simply startup Tomcat and access CAS with https://localhost:8443/cas-web/login You should see the CAS login screen and no errors in your catalina logs.

Setting up Liferay Portal:
  • Remove the sevencogs theme and the sample data by deleting the two sevencogs folders at the liferay-portal-5.2.3\ tomcat-6.0.18\webapps folder and by deleting the lportal.properties and lportal.script files at the liferay-portal-5.2.2\data\hsql folder.
  • Now if you run the liferay you should be able to login to portal by
E-mail: test@liferay.com
Password: test
  • In the webapps/ROOT/WEB-INF/web.xml file add a new filter as shown below(add it as the first filter).
  • Then add the filter mapping directly above the first existing filter mapping as shown below.
  • Then add the following to the rest of the auto login filters.(Just after the last existing auto login filter)
  • Now Start up the Liferay and Go to sign in.
  • It will redirect you you CAS login page.
  • Then Enter the
NetID = test
Password = test
  • Then you will returned back to the Liferay home page as logged in user test.

Tuesday, March 2, 2010

Liferay JIRA with my own JIRA installation.

Although I was able to configure the jira portlet to work with my own JIRA installation (You can find all the steps at my previous post) there was a serious issue with that. When I logged in as a valid user to my Running JIRA (on http://localhost:8090) I can create new projects(only if logged in as administrator), and create new issues to any of projects. In JIRA there is a unique ID for each project. (Eg: 10000, 10010 etc) When you create a new project, JIRA will assign an new unused ID for that and that ID is used everywhere within the database in order to identify the project. Project details are stored in jiradb/project table and issue details are stored in jiradb/jiraissue table. You can go to your database and see them if you want.

The problem with World of Liferay -JIRA portlet was it uses some constant project IDs and names in order to display the issue summery to the user. It stores this constants values in JIRAConstants.java interface. The view_jira.jspf file uses these constant IDs when creating the objects for the projects to display. So in order to change this, I had to change this view_jira.jspf completely.

I connected to the database of JIRA (jiradb) and select all the project IDs, their name and keys from the table project. Then I created the Jiraproject objects according to these data. The code is shown in below.

String[] prjIDs = new String[20];
String[] prjNames = new String[20];
String[] prjKeys = new String[20];
int meme =0;

Connection conn = null;
String myurl = "jdbc:mysql://127.0.0.1:3306/";
String mydbName = "jiradb";
String mydriver = "com.mysql.jdbc.Driver";
String myuserName = "root";
String mypassword = "";
try {
Class.forName(mydriver).newInstance();
conn = DriverManager.getConnection(myurl+mydbName,myuserName,mypassword);
Statement s = conn.createStatement ();
ResultSet resultset = s.executeQuery ("SELECT ID, pname, pkey FROM project");

while (resultset.next() )
{
String myID = resultset.getString("ID");
String myName = resultset.getString("pname");
String myKey = resultset.getString("pkey");

prjIDs[meme] = myID;
prjNames[meme] = myName;
prjKeys[meme] = myKey;
meme = meme+1;
}
} catch (Exception e) {
e.printStackTrace();
}
for (int i = 0; i <>
Object[] jiraProject = new Object[] {Integer.parseInt(prjIDs[i]), prjKeys[i], prjNames[i]};
int projectId = (Integer)jiraProject[0];
String projectKey = (String)jiraProject[1];
String projectName = (String)jiraProject[2];

Saturday, February 27, 2010

Liferay WOL portlets in community pages

Liferay have a set of portlets called World of Liferay (WOL) portlets. Under this category there are list of portlets such as JIRA, SVN, Summery, Friends, summery wall etc. By default these portlets are working only if they are placed on a private page. (eg:My Places -> My Community -> Private pages). If we place these portlets in a community page it will give an error messaye "This application will only function when placed on a user page"

I wanted to place the JIRA portlet in one of the community page and display the content successfully. In order to do that I updated tomcat-6.0.18\webapps\wol-portlet\init.jsp file with the following code.

WindowState windowState = renderRequest.getWindowState();

String currentURL = PortalUtil.getCurrentURL(request);

Group group = GroupLocalServiceUtil.getGroup(scopeGroupId);

Organization organization = null;
User user2 = null;

if (group.isOrganization()) {
organization = OrganizationLocalServiceUtil.getOrganization(group.getClassPK());
}

else if (group.isCommunity()) {
user2 = themeDisplay.getRealUser();
}
else if (group.isUser()) {
user2 = UserLocalServiceUtil.getUserById(group.getClassPK());

}

DateFormat dateFormatDate = DateFormat.getDateInstance(DateFormat.LONG, locale);

dateFormatDate.setTimeZone(timeZone);

DateFormat dateFormatDateTime = DateFormats.getDateTime(locale, timeZone);

NumberFormat numberFormat = NumberFormat.getNumberInstance(locale);


Friday, February 26, 2010

Configuring the JIRA Portlet in Liferay

This is how I configured the world of Liferay portlet-JIRA in Liferay. You can follow the below steps in order to configure that portlets. I'm using atlassian-jira-standard-3.7.4-standalone as my JIRA Installation and liferay-portal-tomcat-6.0-5.2.3 as my Liferay instance.

Installing JIRA:
See my post "Installing JIRA" to install the atlassian-jira-standard-3.7.4-standalone.

Installing MySQL and Connecting JIRA:

In order to configure the JIRA portlet in Liferay, you need to set the JIRA database in to a valid database. You can use any database such as MySQL, Oracle, DB2, Firebird, MaxDB,HSQL etc. Here are the steps to configure the MySQL database for the JIRA. You can find a complete instructions from http://www.atlassian.com/software/jira/docs/v3.7.4/databases/mysql.html

  • I'm using MySQL server 5.0 as my MySQL installation.
  • Create a database for JIRA to store issues (e.g. jiradb). I created it using MySQL Command Line Client.
create database jiradb;
  • Download the MySQL Connector/J JDBC driver from http://mysql.cs.pu.edu.tw/Downloads/Connector-J/mysql-connector-java-5.1.12.zip
  • Add the MySQL JDBC driver jar (mysql-connector-java-3.x.x-bin.jar) to the atlassian-jira-standard-3.7.4-standalone/common/lib/ directory.
  • Edit conf/server.xml and customise the username, password, driverClassName and url parameters for the Datasource.You have to edit followings. Also delete the minEvictableIdleTimeMillis and timeBetweenEvictionRunsMillis parameters.
username="root"
password=""
driverClassName="com.mysql.jdbc.Driver"
url="jdbc:mysql://localhost/jiradb?autoReconnect=true&useUnicode=true&characterEncoding=UTF8"
  • Edit atlassian-jira/WEB-INF/classes/entityengine.xml. You have to edit following parameters.
change the field-type-name attribute to mysql
delete this, if it exists: schema-name="PUBLIC"
  • Then you can start the JIRA using bin/startup.bat
Configuring Liferay:

Since World of Liferay-JIRA portlet is not an out of the box portlet, you have to configure it before using it. You can find a forum on doing this at http://www.liferay.com/community/forums/-/message_boards/message/4574654
Following is the list of steps that I have followd to configure that portlet.

  • liferay-portal-5.2.3\tomcat-6.0.18\webapps\wol-portlet\jira\view_jira_project.jspf uses hard coded urls to issues.liferay.com. I modified them to my JIRA installation URL. So now it looks like
String jiraURL = "http://localhost:8090/secure/Dashboard.jspa?reset=true&pid=" + projectId;

  • I updated wol-portlet\WEB-INF\jdbc.properties with appropriate values to access the JIRA database. So now it looks like:
jira.driverClassName=com.mysql.jdbc.Driver
jira.url=jdbc:mysql://localhost/jiradb?autoReconnect=true&useUnicode=true&characterEncoding=UTF8
jira.username=root
jira.password=

  • I Updated wol-portlet\WEB-INF\classes\portlet.properties to turn on jira synchronization.Now it looks like:
include-and-override=portlet-ext.properties
jira.synchronization.interval=5
  • After that Strat the liferay using bin/startup.bat

Adding the JIRA portlet to Liferay and customize:

Following are the steps that I followed in order to add the JIRA portlet.

  • Login to the Liferay with your user name and password. (May be default user name= test@liferay.com password=test)
  • Go to My Places -> My Community -> Private Pages and click add application.
  • Select and add JIRA and Summery portlets under the World of Liferay category.
  • Then you should see the "Set JIRA login" link in the JIRA portlet and set the login name here.
  • If you get any porblem with setting it from there, go to summery portlet "edit" link and set it.
  • After return to the previous page you should displayed the JIRA portlet.


Installing JIRA

The steps to install JIRA standalone on windows is listed below.
  1. Download the windows standalone version from http://downloads.atlassian.com/software/jira/downloads/atlassian-jira-standard-3.7.4-standalone.zip
  2. Unzip the folder to anywhere you wish to have your Jira installation.
  3. You can start the JIRA by bin/startup.bat.
  4. It will start the JIRA server and you can access it through your web browser using http://localhost:8080. (By default, JIRA Standalone runs on port 8080)
  5. You should now see the Setup Wizard, which will take you through the brief setup procedure. You can find a guide from http://confluence.atlassian.com/display/JIRA/Running+the+Setup+Wizard
  6. In order to complete the setup you need to have a License key for JiIRA. You can use a evaluation key which is generated by creating an account at Atlassian. http://www.atlassian.com/software/Signup!default.jspa?os_destination=%2Fmy%2Fjira%2FLicenses.jspa
  7. After the setup is completed successfully you can login to JIRA and use it through http://localhost:8080.
Troubleshooting:

  1. If you are already using the port 8080 for any other service you have to change that port. (In my case my Liferay is also running on this port).
  2. You can find a good tutorial on how to change port here. http://confluence.atlassian.com/display/JIRA/Changing+JIRA+Standalone%27s+port
  3. This can be fixed by changing JIRA to use another port (eg. 8090). This is done by editing conf\server.xml.
The start of the file looks like:


  • Here, change "8005" to "8006", and change "8080" to "8090" (or some other free port)
  • If you change the port to 8090, you can access the Jira by http://localhost:8090.

Sunday, February 21, 2010

Solving the problem with running Apache Tomcat

I'm using Microsoft Vista and I have installed the JDK (jdk-1_5_0_17-windows-i586-p) I set the path variable and confirmed thatJava is working fine by running "java -version" on cmd and running some Java source files.Then I tried to run Apache Tomcat on on my system by apache-tomcat-6.0.24\bin\startup.bat.But the tomcat command promt window is opened and suddenly dissappered with out running tomcat. The problem was although I have installed JDK, I haven't set the JAVA_HOME variable.

So in order to run Apache ant First you have to install Java correctly.After that set

  • System variable path to where is Java bin(In my case it is C:\Program Files\Java\jdk1.5.0_17\bin\)
  • Add a new system variable JAVA_HOME and set value to where you have installed Java (In my case it is C:\Program Files\Java\jdk1.5.0_17)

Saturday, February 20, 2010

My first experience with JIRA

JIRA is a proprietary enterprise software product, developed by Atlassian, commonly used for bug tracking, issue tracking, and project management. Since I'm developing a " Workflow Management System" I hope to use Jira as the Bug tracking and issue tracking tool of my system and I started to read about JIRA. JIRA has released initially in October 12, 2004 and it is written in Java. JIRA, is not an acronym but rather a truncation of "Gojira" (the Japanese name for Godzilla) It has Proprietary License but free for noncommercial. I hope to get the free version of it :)


JIRA Concepts


Issue : (http://confluence.atlassian.com/pages/viewpage.action?pageId=185729613)

  • Depending on how your organisation is using JIRA, an issue could represent a software bug, a project task, a helpdesk ticket, a leave request form, etc. Key components of JIRA issue are as below. (As shown in the image above)
  • Key components of JIRA issue are as below. (As shown in the image above)
  1. Key — a unique identifier for this issue.
  2. Type — (Bug, Improvement, New Feature, Task ,Custom Issue)
  3. Status — the stage the issue is currently at in its lifecycle ('workflow'). (Open, In progress, Resolved, Reopened, Closed)
  4. Resolution — a record of the issue's resolution (if the issue has been resolved) (Fixed, Won’t Fixed, Duplicate, Incomplete, Cannot Reproduce)
  5. Priority — the importance of the issue in relation to other issues. (Blocked, critical, major, minor, trivial)
  6. Assignee — the person to whom the issue is currently assigned.
  7. Reporter — the person who entered the issue into the system.
  8. Project — the 'parent' project to which the issue belongs.
  9. Component(s) (if applicable) — project component(s) to which this issue relates.
  10. Affects Version(s) (if applicable) — project version(s) for which the issue is (or was) manifesting.
  11. Fix Version(s) (if applicable) — project version(s) for which the issue was (or will be) fixed.
  12. Summary — a brief one-line summary of the issue.
  13. Environment (if applicable) — the hardware or software environment to which the issue relates.
  14. Description — a detailed description of the issue.
  15. Comments — added by people who are working on the issue.

Project: (http://confluence.atlassian.com/pages/viewpage.action?pageId=185729449)

  • A project is a collection of issues:
  • Some Examples are
a software development project
a marketing campaign
a helpdesk system
a leave request management system
a website enhancement request system
  • Issue Example
Project Name : Web site project
Project Key : WEB
Issue keys : WEB 100, WEB 101, WEB103
  • A project component is a logical grouping of issues within a project. Each project may consist of various components (or none)
Project Name : Web site project
Project Key : WEB
Issue keys : WEB 100, WEB 101, WEB103
Components : Documentation', 'Backend', 'Email Subsystem', 'GUI'
Documentation Issues : WEB 100, WEB 101
Backend issues :WEB 103
  • Version : For some types of projects, particularly software development, it is useful to be able to associate an issue with a particular project version.Version can be in any of three states. (Released, Unreleased or Archived)

Workflow (http://confluence.atlassian.com/pages/viewpage.action?pageId=185729618)

  • Workflow is the movement of an issue through various Statuses during its lifecycle.

Liferay Plugins SDK configuration

Liferay's Plugins Software Development Kit is the recommended method of Liferay team to create plugins although it is not the only method. Plugins are themes and portlets. You can add functionality to Liferay by creating portlets and themes for it. In order to use it first you have to install some tools and configure SDK.

Install Ant

  • Plugins SDK requires that you have Ant 1.7.0 or higher installed.
  • Download the latest version of Ant from http://ant.apache.org
  • Uncompress to any folder you choose.
  • Next, set an environment variable called ANT_HOME which points to the folder to which you uncompress Ant.
- On Windows by going to Start -> Control Panel, and double-clicking the System icon.
- Go to Advanced, and then click the Environment Variables button. Under System Variables, select New.
- Make the Variable Name ANT_HOME and the Variable Value the path to which you installed Ant (e.g: C:\Ant\apache-ant-1.7.1), and click OK.
  • To set proper memory settings for building projects.
- Select New again. Make the Variable Name ANT_OPTS and the Variable Value "-Xms256M -Xmx512M" and click OK.
  • Go to PATH environment variable. Select it and select Edit. Add %ANT_HOME%\bin to the end or beginning of the PATH and click OK.
  • To test whether you have properly installed Ant Go to command prompt type ant and press enter.
  • If you get a build file not found error, you have correctly installed Ant.


Configure Liferay Plugins SDK

  • Download the Plugins SDK archive from Liferay downloads page.


  • Unzip the file to any place in which to you wish to carry your works.
  • In that unzipped folder there is a file called build.properties and open it using text editor or IDE.
  • This file contains the settings for where you have Liferay installed and where your deployment folder is going to be.
  • But we can’t customize this file. Instead, create a new file in the same folder called build.${user.name}.properties, where ${user.name} is your user ID on your machine.
You can find your machine ID by right click My Computer -> properties.
Eg: build.Jane.properties where Jane is the Machine ID.
  • Most probably you will need to customise following properties and save the file.
- app.server.dir=
- javac.compiler=
  • app.server.dir: This is the folder into which you have installed your application server.
  • java.compiler: Defaults to the standard Java compiler, modern, from your JDK.
  • In my case build.${user.name}.properties looks as below.
app.server.dir=G:\liferay-portal-tomcat-6.0-5.2.3\liferay-portal-5.2.3\tomcat-6.0.18
javac.compiler=modern
  • Now you are ready to use Liferay Plugins SDK.

Tuesday, February 9, 2010

SSO in Liferay

Single Sign On(SSO) is the feature which allows the user to log in to the portal once and access all the portlets according to his permissions, with out sign in again for different portlets. In order to set up SSO between Liferay portal and the existing portlets, I decided to integrate Liferay web portal with the JA-SIG CAS (Central Authentication Service) Server. First I read articles and research papers about the SSO and got an understanding about what is actually meant by SSO and how it works with Web Portals. Then I clearly identified the procedure of SSO and the following diagram illustrates it.


After that I read about how to install CAS server. In order to do that I downloaded CAS Server and I installed Tomcat Server. After setting up CAS server in the Tomcat installed CAS client in Liferay. After that I generate an SSL cert for the CAS server. Finally I did all the configurations on Liferay portal in order to work with Liferay.

Monday, February 8, 2010

LDAP authentication in Liferay

User management is one of the most critical part of my Workflow Management System(WMS), since it is necessary to manage the users properly and efficiently. Although Liferay has its own method to manage users it is not suitable for the WMS because of several reasons. I start to do research and implement user management system for the WMS. First I decided to integrate Liferay with LDAP (Lightweight Directory Access Protocol) directories to store the authentication and authorization policies. I decided to do that because The LDAP directories are made for high performance lookups thus addressing the high traffic load and the LDAP directories are often the source for the single sign on system to authenticate against.

In order to do that I used Apache Directory Server, which is an embeddable directory server which is written in Java. I also used JXplorer LDAP browser for the directory browsing purposes. First I input users to the system using LDAP browser. Then I connected the Server with relevant ports and finally I changed the settings of Liferay portal in order to integrate it with LDAP Directory. After doing these things I was able to authenticate users to the system via LDAP directory.

You can find the full description of integrating LDAP with Liferay from here.

Sunday, February 7, 2010

Integrate Alfresco with Liferay

Following are the steps to integrate Liferay portal 5.2.3 and the Alfresco 4.2.1

  • Download the Alfresco .war file
http://downloads.sourceforge.net/lportal/liferay-portal-alfresco-4.2.1.war?download
  • Rename the file to “alfresco.war”.
  • Login to the Liferay as administrator.
  • Go Dock -> Add Application -> Install more Applications -> Upload File.
  • Browse and select the path of “alfresco.war” and click install.
  • Then go back and go to Dock -> Add Application.
  • Now you can see the Alfresco portlet under content management category.
  • If it is not displayed their refresh the page or restart the portal server.
  • You can log in to the alfresco using username : admin and password: admin.

Alfresco Document repository

Document Management is one of the most important task of any software developing company. Documents are created at almost all phases of the software development process and these documents are kept as live documents most of the time. So constant upgrading, versioning and reviewing are essential parts of the document repository.

Alfresco offers document management using familiar interfaces to get rapid user adaption built on a repository that offers transparent, out-of- sight services. It has fully supported Enterprise Edition and a freely downloadable open source Community Edition.
  • Highly scalable, clustered J2EE architecture using commodity software and hardware.
  • Capable of Standards-based JSR-168 and REST-based integration.
  • Single sign-on through NTLM or LDAP.
  • Integrated Transformation Services: Office to ODF/PDF, PowerPoint to Flash
  • Compatibility with JSR-168.

Friday, February 5, 2010

Liferay and SOA

One of the main characteristic of a portal is that the origin of the data that it holds can be initialized at any place and integration of this information is handled by the Web portal. Another important characteristic of a portal is different users who have different roles within the organisation must be able to see different views of the same web portal depending on permissions they have. The main component of the portal is the portlets which are self contained interactive elements written according to a particular standards like JSR-168, JSR-286 etc. Portlets are the components that render the markup fragment that represents the applications. Because of these characteristics of the web portal and the portlets it is possible to extend the Liferay using the Service Oriented Architecture (SOA).

All the applications that we integrate with the Liferay are portlets and since portlets are developed independent from the portal itself and loosely coupled with the portal, it is possible to use SOA. Since Liferay portal uses and open SOA framework and provides tools and framework to extend SOA to other enterprise applications, SOA can be easily implemented. The Liferay provides mechanism to the developers to quickly implement the SOA concept. The Liferay portal comes packaged with a powerful tool known as ServiceBuilder which helps to develop the SOA. There are lot of technologies needed for SOA such as Web Services, Spring and Hibernate and it is necessary to write and configure lot of files when implementing SOA. But the ServiceBuilder of Liferay automates most of these things and the only thing the developer has to do is implement the business logic which is the key aspect of the portal. So it is possible to extend the Liferay using these things to implement powerful SOA.

When implementing SOA with the Liferay the first thing we have to do is define the data model. In order to do that it is necessary to write an XML file called service.xml with all the necessary fields, keys and finder methods. After that we need to run the ServiceBuilder using Ant and number of files are generated. Among these files, Spring configuration files, SOAP and Tunnel classes, WSDL files Javascript web services methods, Data model classes, Hibernate classes, SQL create and index scripts are included.

After Defining the data model it is necessary to declare the business methods. We can declare any business methods in Remote and Local service classes. After run the ServiceBuilder task in Ant again, those methods will be propagated into the SOAP and Tunnel classes and WSDL files and Javascript Web Services methods.

The final step in implementing SOA is implementing the business logic. The remote implementation class do security and permission checks like any other J2EE application. The local implementation class contains the business logic that we allow the trusted sources to invoke. After doing all these three steps we have to compile the code and SOA is implemented.

Web Services for Remote Portlets (WSRP) is another way of implementing SOA with SDWMS. WSRP is a specification which defines the methods on how to combine SOAP based Web Services that generate mark-up fragments within a portal. The main goal of the WSRP is to bring the Web Services and the benefits of SOA to the end users. WSRP is built on top of the existing Web Services Standards such as SOAP, WSDL and UDDI.

Web Services allows to re-use the back end services and WSRP allows to reuse the user interface. As an example we can use this with Liferay as follows. If we decide to provide the users of the SDWMS to retrieve news alerts or price of stocks, we can first look whether there is already Web services which provide these functionalities. We can search in UDDI registries for web services portlets to find a web service which provides this functionality. After finding such a portlet, the process of adding it to the portal is simple. Since the portlet is being consumed through WSRP we don’t need to do any custom coding or deployment activity.

WSRP architecture defines three types of actors. They are,
  • WSRP producer – In the above example it is the web service that which offers portlets which implement the WSRP interfaces and the news alerts or stock quotes functionality.
  • WSRP portlet – This is the pluggable user interface component that runs inside the WSRP producer and it can be accessed remotely through the interface define by the producer.
  • WSRP consumer – This is the client that invokes the WSRP web services offered by the producer. In above scenario it is the SDWMS portal.
The process of Discover, publish and run the web services using WSRP is shown by the following figure.

Thursday, February 4, 2010

Working With Liferay Portal.

As the world's leading open source portal platform, Liferay portal provides a unified web interface to the data and tools scattered across many sources. Few months ago I started to work with Liferay in order to develop an Workflow Management System. I guess I'm in the correct track by selecting the Liferay as my portal platform. :)

Personalization, Content Aggregation, Authentication are major key words associated with a portal. Let's see how to work around with them soon !!!!!

Wednesday, February 3, 2010

LDAP Authentication and Single Sign On(SSO)

When implementing my Workflow Management System, I have to implement Single Sign On. Following are the facts I gathered about SSO and LDAP during my research.
  • SSO is the ability for a user to enter the same id and password to logon to multiple applications within an enterprise.
  • Single sign on benefits are:
  • Ability to enforce uniform enterprise authentication and/or authorization policies across the enterprise
  • End to end user audit sessions to improve security reporting and auditing
  • Removes application developers from having to understand and implement identity security in their applications
  • Usually results in significant password help desk cost savings
  • Since the internet is stateless, this means that the single sign on software must check every request by the user's browser to see if there is an authentication policy pertaining to the resource or application the user is trying to access.
  • In a medium to large enterprise, this means that every time the user clicks on a different URL, there is traffic between the user's browser, the web or application servers and the security server.
  • Therefore, most modern single sign on systems use LDAP (Lightweight Directory Access Protocol) directories to store the authentication and authorization policie
  • The LDAP directories are made for high performance lookups thus addressing the high traffic load.
  • Further, the LDAP directories are often the source for the single sign on system to authenticate against.
  • The above are the reasons why LDAP directories and authentication have taken on such a dominant role in enterprise authentication. LDAP directories offer the following features:
  • They are very quick for doing identity reads against as compared to traditional databases
  • They are low cost - in fact some LDAP directories are available for free
  • Virtual LDAP directories enable quick linkage between multiple databases and multiple LDAP directories
  • LDAP directories are excellent for doing rapid LDAP authentication against for any digitized authentication
  • LDAP directories have a universal protocol enabling quick interaction and exchange of identity information between enterprises
  • LDAP directories can be easily partitioned to place the directory close to the end user, thus improving performance and reducing network load
Single Sign On (SSO) systems mostly use LDAP authentication. The enterprise user logs on in the morning and sees normally a form based enterprise login screen. The user enters in their id and password. The SSO software then takes the information and sends it to the security server using an encrypted connection. The security server in turn then logs on to the LDAP server on behalf of the user by providing the LDAP server with the user's id and password. If successful, the security server then proceeds with any authorization and/or lets the user proceed to the application or resource they require.

LDAP Authentication Implementation

Often times a simple LDAP directory authentication project hits trouble. These can be because of:
  • Poor authoritative sources
  • Poor identity data
  • No unique global id's
  • Poor synchronization between the authoritative source and the LDAP directory
  • Poor design of the LDAP and SSO authentication strength
  • Poor design of the LDAP and SSO failover and disaster recovery

Monday, February 1, 2010

Web Portals

A web portal refers to a web site or web based interface which offers a broad array of resources and services and it presents information from diverse sources in a unified way. There are several portal categories and this chapter discuss more about the enterprise portals and the currently available open source portal engines.

An enterprise portal is a Web-based interface for users of enterprise applications and it provides access to enterprise information such as corporate databases, applications, and systems.
Java Portlet Specification (JSR) 168 that enables interoperability among portlets and portals was released in mid of 2003. This specification defines a set of APIs for portlets and addresses standardization for preferences, user information, portlet requests and responses, deployment packaging, and security. These standards allow portal developers, administrators and consumers to integrate standards-based portals and portlets across a variety of vendor solutions. A plethora of offerings are currently available in the portal software market and they make it possible to bring together all aspects of portal functionality.

The major goal of the portal software vendors is to provide a scalable, flexible and a reliable portal framework and some of the vendors have enhanced the portal framework by including more features with their framework. Those frameworks with the enhanced features can be considered as a complete portal solution. Some of the major functionalities of web portal software are,
  • User and community management
  • Personalization
  • Aggregation
  • Security
  • Integration
  • Search
  • Interaction management and administration
Some portal software is proprietary and encourages use of other products by the same vendor, whereas other offerings are very open. So what software to choose from and develop on depends on one’s priorities and requirements.

Some examples of open source portals are,
  • Liferay
  • JBoss
  • Exo
  • GridSphere
  • uPortal

Enterprise Integration Architecture(EAI)

During my research on EAI, I gathered following facts about it.

Integration of the applications and the business processes is a top priority for many enterprises today. Requirements for improved customer service or self service, rapidly changing business environments and support for the mergers and acquisitions are major drivers for increased integration between existing “stovepipe” systems and information silos. Many different tools and technologies are available to address the complexities of integration of the systems and EAI is one of the most challenging architecture.

EAI is defined as the use of software and computer systems architectural principles to integrate a set of enterprise computer applications. It is an integration framework composed of a collection of technologies and services which form a middleware to enable integration of systems and applications across the enterprise. EAI is a business need to make diverse applications in an enterprise including partner systems to communicate to each other to achieve a business objective in a seamless reliable fashion irrespective of platform and geographical location of these applications.

EAI is a flexible and cost effective system integration strategy and architecture that replaces traditional point-to-point integration and EAI can be described as the task of getting independently designed applications to work together. Before the advent of EAI, applications were interfaced on a point-to-point basis. Interfaces were programmed for each interface point in each application. This solution delivered inflexible interfaces that organizations found difficult to manage. Integration complexity increased as more point-to-point interfaces were implemented. Although this is a tightly coupled and operationally effective approach, it often required significant maintenance cost and can limit the extensibility of the solution in relation to other business applications.

In implementing EAI solutions organizations have been able to realize various benefits including:
  • Ease of Development and Maintenance
  • Enhanced performance and reliability
  • Implementation of a centralized information bus
  • Extension of the legacy system lifecycle
  • Reduced time to market
  • Real time information access among systems
  • Streamlines business processes and helps raise organizational efficiency.
  • Maintains information integrity across multiple systems

Although EAI is beneficial for a company in several ways it has some disadvantages as below:
  • High initial development costs, especially for small and mid-sized businesses (SMBs).
  • EAI implementations are very time consuming, and need a lot of resources.
  • Require a fair amount of up front design, which many managers are not able to envision or not willing to invest in. Most EAI projects usually start off as point-to-point efforts, very soon becoming unmanageable as the number of applications increase.
References:
  1. www.mincom.com/company/whitepapers/eai_whitepaper_us.pdf
  2. www.liquidhub.com/docs/Horizons_EAI.pdf

Software as a Service (SaaS)

Following is a small description of SaaS which I was found during my research on it.

Software as a Service (SaaS) is a model of software deployment whereby a provider licenses an application to customers for use as a service on demand. SaaS software vendors may host the application on their own web servers or download the application to the consumer device, disabling it after use or after the on-demand contract expires. The on-demand function may be handled internally to share licenses within a firm or by a third-party application service provider (ASP) sharing licenses between firms.

SaaS is becoming an increasingly prevalent delivery model as underlying technologies that support Web services and service-oriented architecture (SOA) mature and new developmental approaches, such as Ajax, become popular. Meanwhile, broadband service has become increasingly available to support user access from more areas around the world .
The traditional model of software distribution, in which software is purchased for and installed on personal computers, is sometimes referred to as software as a product.

BENEFITS OF SAAS

Some of the benefits of SAAS model are as follows.

  • Easier administration.
  • Automatic updates and patch management.
  • Compatibility: All users will have the same version of software.
  • Easier collaboration, for the same reason.
  • Global accessibility.
  • Save money and time.
  • Focus on technology budgets on competitive advantage rather than infrastructure.
  • Much lower risk.
DISADVANTAGES OF SAAS

Some of the disadvantages of SAAS are as follows .

  • Some organizations find it very difficult to relinquish control or trust third parties to manage their applications and data
  • Some vertical markets require industry specific business applications for which SaaS solutions are not available.
  • Organizations without clear objectives and defined business processes will be no better off with a SaaS solution than with an on-premise solution.
References:
  1. http://searchcloudcomputing.techtarget.com/sDefinition/0,,sid201_gci1170781,0.html
  2. http://www.trumba.com/connect/knowledgecenter/software_as_a_service.aspx
  3. http://www.online-crm.com/saas_advantages_disadvantages.htm